Getting started
You own a private server, either it is virtual or dedicated, you still own a server, with a set of dedicated IPv4 addresses. You are not interested to invest time learning how email authentication work and you are tired that your emails go straight to junk.
Why would you use a relay mail server:
Why would someone invest time into setting up a relay server? There are plenty of Pro’s and Con’s, so before going straight into the implementation, you should consider the following:
- Using Amazon SES, you won’t need a clean set of IPv4 anymore. Some hosting providers will give you blacklisted IP’s, from which sending email is almost impossible (Since most blacklist will block your emails)
- Amazon SES meet delivery standards with its Content Filtering, ensuring a high delivery rate of emails.
- Using Amazing SES, you won’t need to setup a ReverseDNS records anymore.
- Relay servers have a cost, .10$ per 1000 emails sent.
- You must also pay for any attachment you add to your emails, at the price of .12$ per GB
- You can optionally pay 24.95$ per month for a Dedicated IPv4 with Amazon
- You have to pay 0.9$ per 1000 email received.
The following implementation considers the following:
- I wanted to keep and store my emails locally, to prevent from paying the costs of mail storage and emails received (since I have multiple emails accounts receiving quite a lot of emails)
- On the other hand, I do not send that many emails, and I wanted to save myself the trouble with email delivery so I wanted my emails to be relayed through Amazon servers.
Enabling domains to send using Amazon
First off, you will need to create an account with [Amazon AWS](https://aws.amazon.com/ses/).
Amazon won’t let you send email from their servers without verifying that you are the owner of that domain. To do so, head over to your Amazon management console, and select Amazon SES in the services list.
You will find on the left, a panel named Identity Management. You want to select Domains so that we can add a new domain to your list of identities.
When completed, Amazon will provide you with a TXT record to add to your DNS, in order to confirm that you are the actual owner of the domain.
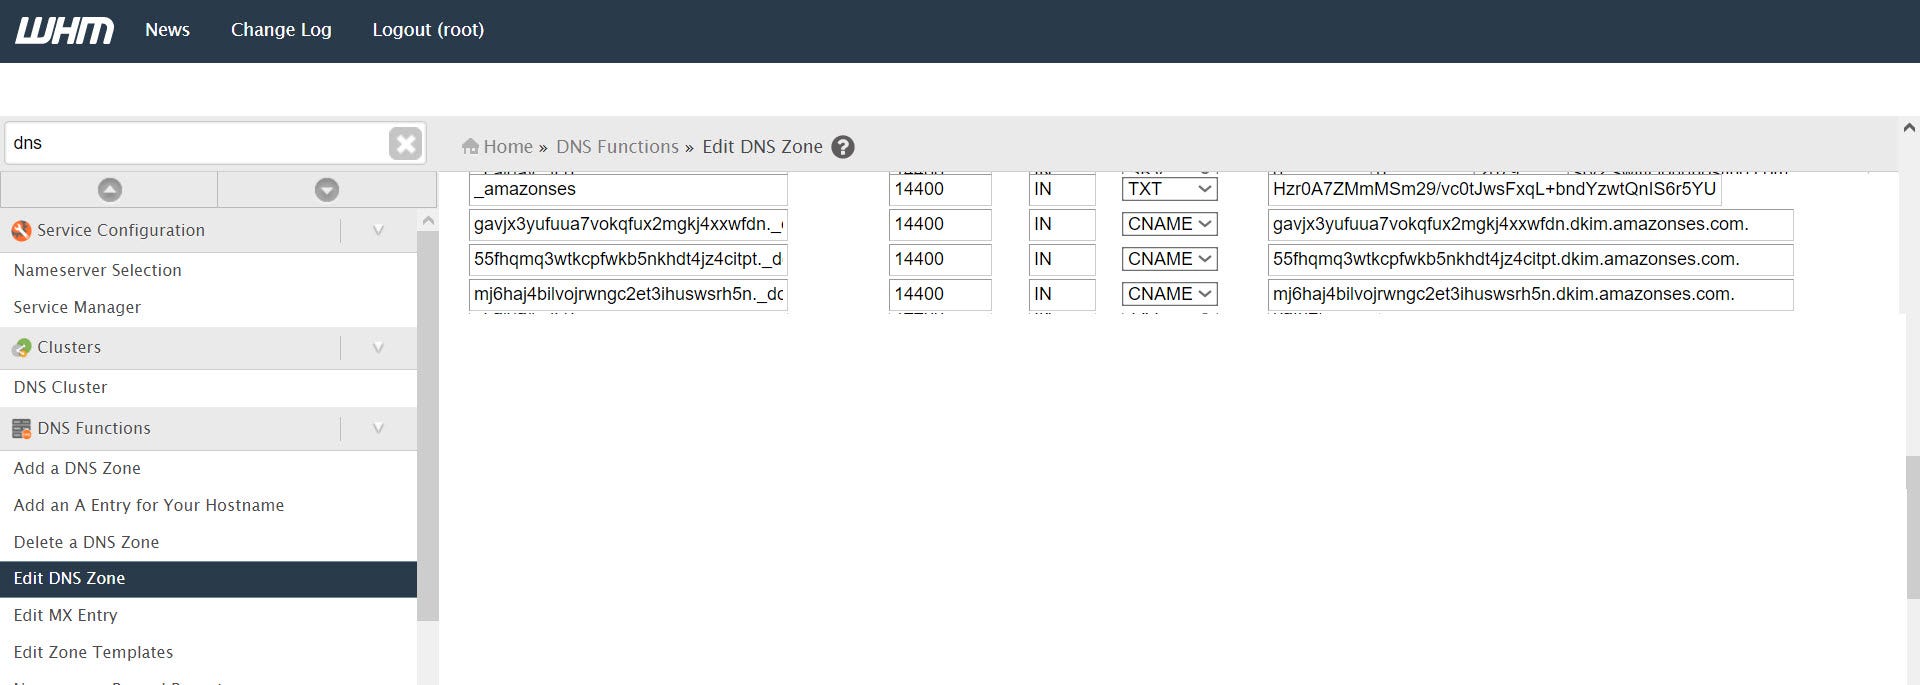
This is the point where you need to head over to your WHM server, and add the DNS record given by Amazon. You can do that by going into Edit DNS Zone, and selecting the appropriate domain.
_amazonses 14400 in TXT “value”
- Ensure you write only
_amazonsesin the domain part and not _amazonses.domain.com.* - Note: It may take up to 72hours for amazon to confirm your identity so you’ll have to hang in there while they to the verification.

Configuring the mail relay in WHM
Whenever your domain is cleared up and ready to be used, you will be able to add a few lines to your Exim Configurations that will forward all email you would normally send, to amazon instead (And then, Amazon will deliver those emails).
Do to so, head over to Exim Configuration Manager and select the Advanced Editorin your WHM control panel.
We will add extra configurations to the following sections:
1. PREROUTERS
2. TRANSPORTSTART
3. AUTH
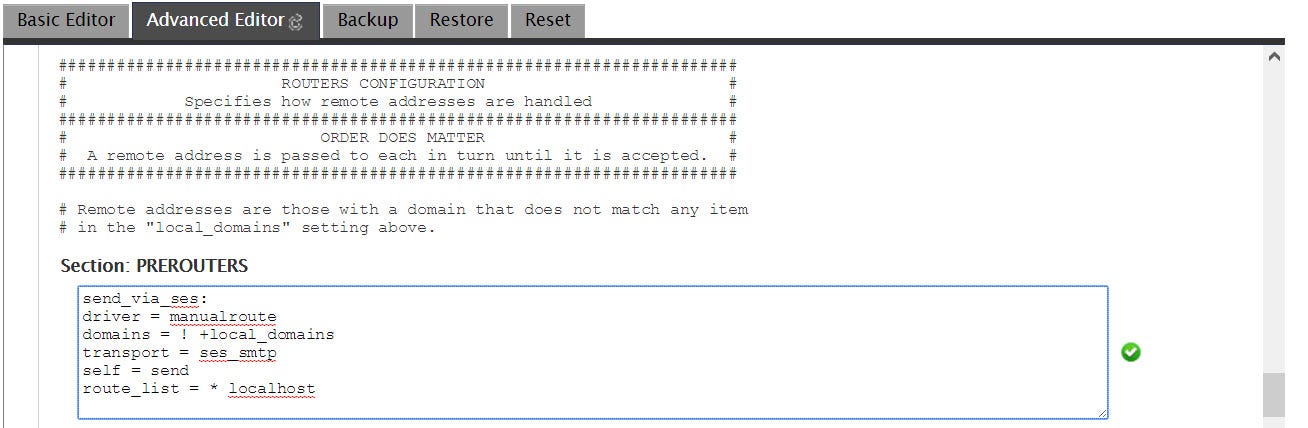
PREROUTERS
You will find in the editor the PREROUTERS section. There will be a big blank box, in which you can add extra configurations. Let’s add the following to it:
send_via_ses:
driver = manualroute
domains = ! +local_domains
transport = ses_smtp
self = send
route_list = * localhost

TRANSPORTSTART
Just like the PREROUTERS, you will need to add configurations into the white box of the TRANSPORTSTART.
ses_smtp:
driver = smtp
port = 2525
hosts_require_auth = localhost
hosts_avoid_tls = localhost
Note: this method use a secure tunnel, which is why the host is localhost. We will send all email through that local secure tunnel that we will keep open with Amazon.
AUTH
In this section, you will need to go back on AmazonSES and generate your SMTP login details. You will find a tab under Email sending -> Smtp Settings. Follow the instruction there and keep your login details somewhere safe. We will need them for the AUTH part.
Find the AUTH section and let’s add the following configurations:
ses_login:
driver = plaintext
public_name = LOGIN
client_send = : USERNAME : PASSWORD
Note: You will need to replace USERNAME and PASSWORD with the credentials given by Amazon
There we go, our routing configuration is now fully implemented. All emails will be routed to Amazon servers. We have two more things to do now. Since we are using a Secure tunnel, we need to configure that tunnel.
Configuring the secure tunnel
If you are running under CentOS or RHEL, you can install Stunnel, which will allow us to make that secured channel to send our email
Install Stunnel if you do not already have it:
yum install stunnel
edit /etc/stunnel/stunnel.conf and add the following configuration to it:
[smtp-tls-wrapper]
accept = 2525
client = yes
connect = email-smtp.us-west-2.amazonaws.com:465
delay = yes
sslVersion = TLSv1
Note: use the proper amazon connection link, depending on the region you got your AWS service from
Start the secure tunnel
sudo stunnel /etc/stunnel/stunnel.conf
Make Stunnel start on server boot, by editing the crontab
sudo crontab -e
Add to the crontab
@reboot stunnel /etc/stunnel/stunnel.conf
For extra reference, see this guide by Amazon:
Setting Up a Secure Tunnel to Connect to Amazon SES
Removing the sandbox mode
You will need to contact Amazon in order to lift the sandbox mode. This is mandatory otherwise you won’t be able to send email to external domains !
You must contact Amazon and ask for a limit increase. They will ask a few questions about your intents (This is probably to filter spammers), and then when the sandbox mode is lifted, everything will be working perfectly!
You can contact Amazon to lift that limit here: Extended Access Request
Conclusion
You have to do the validation part for each domain that you own in CPanel. The implementation here assumes that you want all your email routed through Amazon SES.
You can always add conditions to the send_via_ses part in the PREROUTERS section. Such condition could make only one of your domain in CPanel do the routing, or only one of them not do it etc…
Hope you enjoy sending mail with Amazon now!
6
)
